MaGie Miniature Painting
  • Home
  • About Me
  • My Portfolio
  • Tutorials
  • Reviews
  • Event Reports

MaGie Miniature Painting

  • Home
  • About Me
  • My Portfolio
  • Tutorials
  • Reviews
  • Event Reports
    Tutorials

    Step by step: Freehand banner backside (Gold NMM)

    written by MaGie

    Hi everyone,

    Today I would like to share a step by step on creating an easy freehand pattern. I painted this pattern on the backside of a banner. As there is plenty of space, I used more transition colours in the gold than I would on smaller areas.

    The colours I used for the gold NMM were, from dark to light:

    – VMC German Camo Black Brown (150)
    – VMC Leather Brown (147)
    – GW Bestial Brown*
    – GW Snakebite Leather*
    – GW Bubonic Brown*
    – GW Flash Gitz Yellow
    – VMC White (001)

    For touch-ups I used GW chaos black and GW Regal blue (main colour of backside)

    * These Games Workshop paints are from the old range.

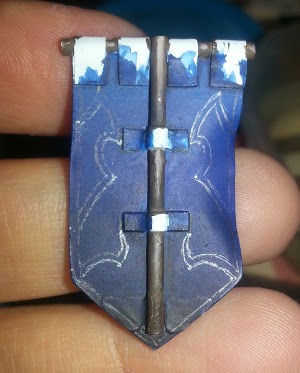
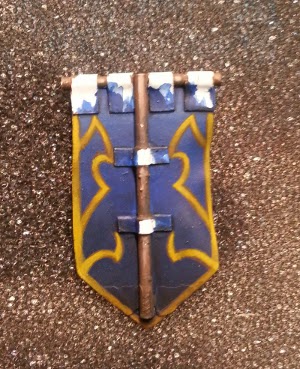
    Before starting the freehand pattern, the blue background of the banner is already painted and completely blended to satisfaction. I find it easier to work like that when I am making freehand lines. 

    There are some ugly spots on the banner, I am aware of that, I have cleaned this afterwards :). Please excuse the not-so-great pictures, I only had my cellphone at hand.
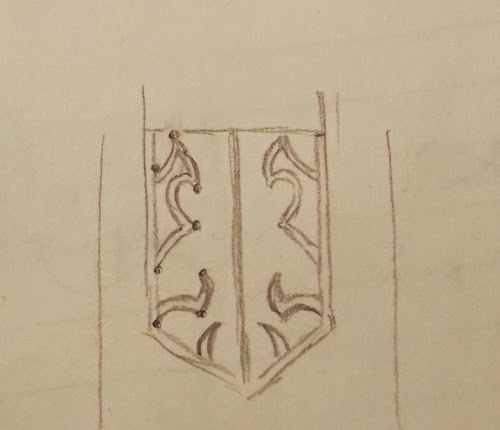
    Step 1
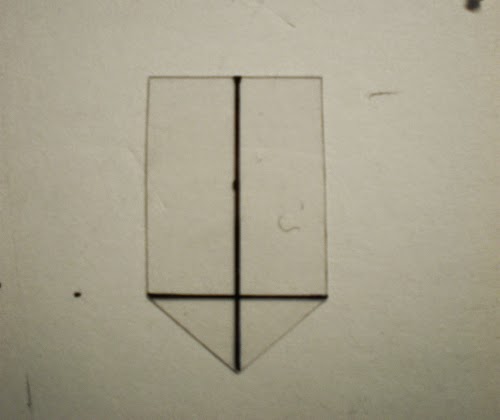
    I started by drawing the freehand pattern I wanted to use on a piece of paper, and I made sure the scale is correct so I could easily transfer the pattern to the banner. In this case, I was lucky, as the banner is so big, I could easily draw on true scale 🙂

    After completing the drawing, I used the left side to mark some recognizable spots (with a little dot), so the transfer would be easier. I only did this on the left side, because the pattern was supposed to be symmetrical in the end.
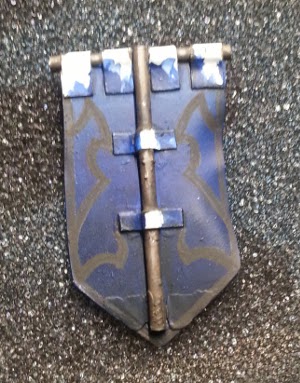
     Step 2
    I started by measuring the position of the dots in the paper drawing, and copy the dots on the banner. I use a regular pencil for this. After copying the dots, I used the alltime favorite “connect-the-dots” game and created the pattern on the banner with the pencil. I decided to not draw the spikes in the bottom, as that area on the banner is ugly and will need to be solved another time.

    Here you also see a size reference 😛
    Step 3
    Finally time for some paint. I filled in the pattern with VMC German Camo Black Brow, making sure to cover all the pencil stripes. I used a brush from Rosemary& Co for this: a 2/0 size Kolinsky Sable Spotter brush from the 323 Series. These brushes have a very think belly, with short hairs and a very sharp point. I find them really great to use for painting freehands.I also use a little bit of flow improver (Winsor & Newton), because it will sure that the paint transfers easier from brush to the painted surface. It also extends the drying time a bit, and as there is so little paint on the brush that helps a lot.

    Step 4
    After that I covered most of the black brown with VMC leather brown. These first steps created the general outline, and they also form a solid basecolour for the next steps.

    Step 5
    As everything looked dull still, it was time to add some brighter colours. I started by covering a slightly smaller area with Bestial Brown. You can see the most difference in the lowest part of the banner.
    Step 6
    In this step I painted Snakebite Leather on smaller areas. These areas will define the beginning of the highlights.

    Step 7
    I used a mix of Snakebite Leather and Bubonic brown in 1:1 ratio to smaller areas of the highlights created in the previous step. The brush I was using was too big to use comfortably, so I changed to using my 10/0 Kolinsky brush from series 33 of Rosemary & Co.
     

     Step 8
    I continued the previous steps, painting smaller and smaller areas of highlights. First using a 1:1 ratio mix of Bubonic Brown and Flash Gitz yellow, then using pure Flash Gitz yellow, next using Flash Gitz yellow and white in a 1:1 mix, and finally using pure white.
     Step 9
    Now that the design was finished, I used my tiniest brush: a 10/0 red sable brush from the series 92 of Rosemary & Co to paint a thin line of black around the freehand. I did this to tidy things up a bit, and to make the pattern stand out more. After that I went back in with the blue background colour to smooth out the black line.

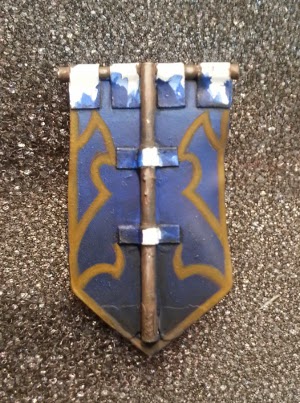
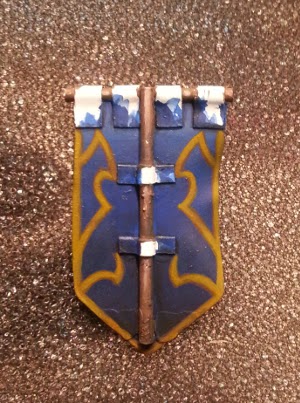
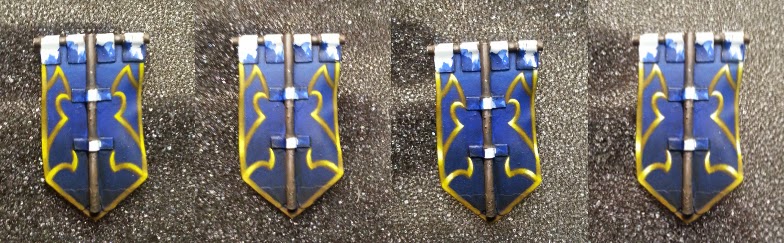
    Then it was time to finish the banner.

    I hope you enjoyed this step by step. The front side of the banner is quite different, and I also made some step by step pictures, if I manage I will post that as well 🙂

    For now, have a nice weekend everyone!!!


    Step by step: Freehand banner backside (Gold NMM) was last modified: augustus 1st, 2016 by MaGie
    mei 16, 2014 0 comment
    1 Facebook Twitter Google + Pinterest
  • Work in Progress

    GW Dark Elf Sorceress WIP Part 3

    by MaGie mei 13, 2014

    This past weekend I spent a little more time on lady Sorceress, and now she is almost finished 🙂 As you can see the top of her staff is still…

    Read more
    0 Facebook Twitter Google + Pinterest
  • Tutorials

    Making a simple banner – step by step

    by MaGie mei 4, 2014

    Hi everyone, In this post I would like to share with you how you can easily make a banner. There are many ways of course, but this is how I…

    Read more
    1 Facebook Twitter Google + Pinterest
  • Favorites

    Favorites of April 2014

    by MaGie mei 2, 2014

    Hi everyone, I wanted to re-introduce the “favorites” posts on my blogs. I did this a while back to share some links with you guys, including paintjobs that inspire me,…

    Read more
    0 Facebook Twitter Google + Pinterest
  • Gallery

    Finished works: Freebooter Sansâmes

    by MaGie april 25, 2014

    Hi everyone, As I told before I have been painting some miniatures for Freebooter, and I just wanted to show you some pictures of the finished works. Here are the…

    Read more
    0 Facebook Twitter Google + Pinterest
  • Tutorials

    Bases, Plinths & Sockels

    by MaGie april 23, 2014

    Hi everyone, In this post / article I would like to share all the options that we have to base our miniatures. Every miniature we paint deserves to be on…

    Read more
    2 Facebook Twitter Google + Pinterest
  • Reviews

    Review: Miniature Painting Secrets with Natalya

    by MaGie april 23, 2014

    This is a review on the HD download version of “Miniature painting secrets with Natalya”, available from CoolMiniOrNot store. In this article I will review the HD download version of the dvd…

    Read more
    1 Facebook Twitter Google + Pinterest
  • 1
  • …
  • 12
  • 13
  • 14
  • 15
  • 16
  • …
  • 25

About Me

About Me

MaGie

Hi everyone! My name is Maartje Giesbers and I am a miniature painter from the Netherlands. Welcome to my site :)

Keep in touch

Facebook Google + Instagram Youtube Email

Instagram

Recent Posts

  • Redgrass Games: Everlasting Wet Palette 2

  • Update & Revival

  • Redgrass Games: Everlasting Wet Palette

  • Review: Asset Drop Discovery Subscription Box

  • HobbyZone: Painter Grip

Popular Posts

  • Painting skintones: Paints, tips & tricks

    mei 19, 2015
  • Rathcore: V3 Series Miniature Holders

    september 2, 2016
  • Tips & Tricks: How to improve?

    maart 25, 2016
  • Crazy Wenky Display Plinths

    november 9, 2016
  • Step by step: Fast & easy Tattoos

    oktober 22, 2014

Instagram Slider

Geen feed

Archieven

Categorieën

  • Event Reports (10)
  • Favorites (16)
  • Gallery (31)
  • Happy Painting Journey (2)
  • Ramblings (10)
  • Reviews (30)
  • Tutorials (30)
  • Uncategorized (11)
  • Work in Progress (57)

Meta

  • Inloggen
  • Berichten feed
  • Reacties feed
  • WordPress.org
Footer Logo

@2016 - PenciDesign. All Right Reserved. Designed and Developed by PenciDesign


Back To Top