MaGie Miniature Painting
  • Home
  • About Me
  • My Portfolio
  • Tutorials
  • Reviews
  • Event Reports

MaGie Miniature Painting

  • Home
  • About Me
  • My Portfolio
  • Tutorials
  • Reviews
  • Event Reports
    Tutorials

    Dark Eldar Step-by-Step Part 5: Steel NMM

    written by MaGie
     
    Hi everyone! 
    Today I am excited to share the fifth part of the Dark Eldar step-by-step tutorials. You can find the other parts here: Part 1, Part 2, Part 3 & Part 4.
    In this post I will focus on painting the steel NMM on the blade. Mind you, the blade is not finished after this, it still needs some flashy colours in the runes (or whatever it is), but “that is another story and shall be told another time”!
    Before I start, I will write a tiny ramble. Just because that is what I do :). The past few weeks I have seen some discussion about using NMM (non-metallic metals) or true metallic paint to paint metallic surfaces. At the moment I don’t really feel like sharing my full thoughts on the matter, but maybe I will post a longer piece about this in the future. Please let me know if you are interested!
    So, to be short, I have absolutely no preference for either the one or the other! Both have their purposes and both can look extremely good. I use both techniques, and honestly it depends on the figure what my preference is. For example, Alice was painted in metallic paints because I like that on steampunk pieces. When I am going for a more cartoonistic look, like the dark eldar, I choose NMM. It’s great that there are different opinions, as that creates diversity in our hobby. For me, I like both :)!
    That being said…. I am not claiming to be an expert in either technique. They are hard to master! For me, true metallics even more than NMM. In this SBS I am showing you how I painted the NMM of the dark eldar weapon. Perhaps it is not perfect NMM, but it works alright and so far I am happy with how it looks 🙂
    So let’s get started!!
    Sorry for the blurry pics. I did not check picture quality during the painting 🙁
    These are the colours I have used (from dark to light):
    • Chaos Black (GW)
    • Abyssal Blue (Scale Color)
    • Anthracite Grey (SC)
    • Caspian Blue (SC)
    • Bering Blue (SC)
    • Artic Blue (SC) – Haha annoying name, I keep wanting to add the C
    • White (SC)
    As you can see, I am mainly using Scale Color paints, from Scale 75(Scale75 paints). I am currently testing a variety of their paints, and although it takes some getting used to (as you can see in this review on their flesh paint set) I really enjoyed painting with them. Especially the metallic paints are superb. 
    The Scale Color paints are really extremely matte. I think it
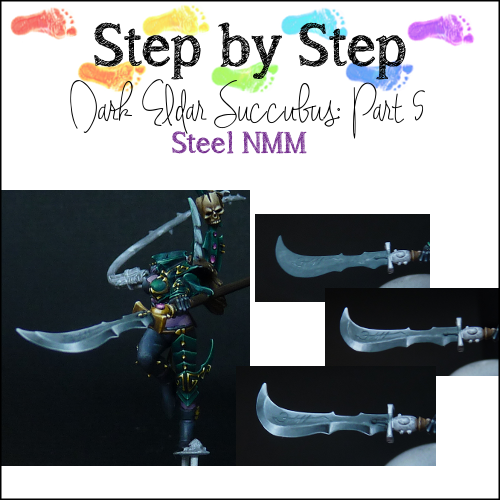
    looks great in NMM, reminds me of the Rackham style. Building up the layers
    look quite rough with this paints, but once you start blending I really
    notice a difference from my NMM with Vallejo paint.
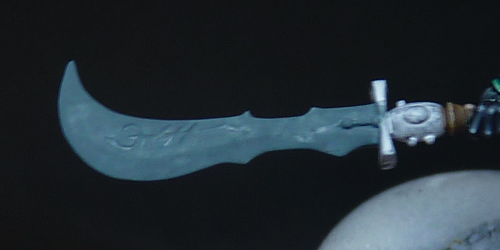
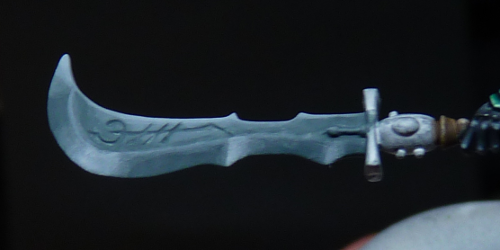
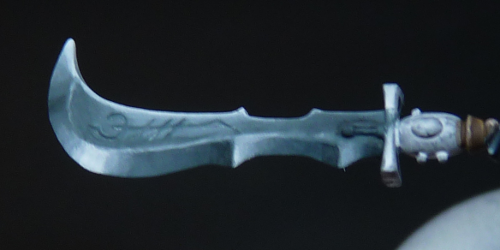
    Basecoat
    I started painting the basecoat using a mix of Anthracite Grey, Graphite and a little bit of Caspian Blue (ratio 4:6:1). I paint this in basecoat consistency in several layers until the coverage is opaque.

    First Highlight
    I have added Graphite and a little bit of Bering Blue to the basecoat. It is hard to tell exactly, but I think 2 parts basecoat, 2 parts Graphite and 1 part Bering Blue. With this mix I started blocking in the highlights. For all highlights and shading layers I used a layering consistency.

    On the picture you can clearly see where the focus is. For the moment, I do not care about making smooth transitions. Only blocking in colours to see if it works.
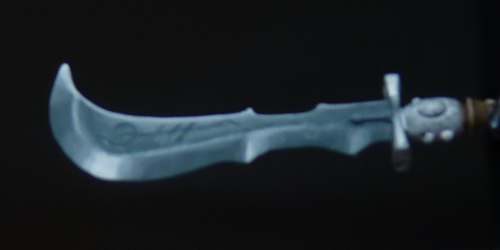
    Second Highlight
    I added a bit of Artic Blue to the previous mix (3:1 ratio) and I painted that on top of the previous highlights but on a slightly smaller area. Notice that the area is still quite large, especially on the curved part of the blade.
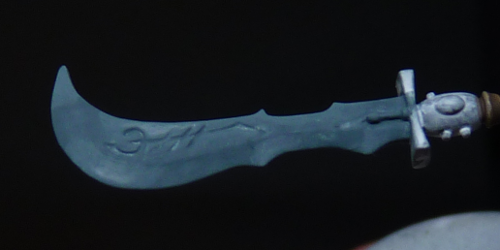
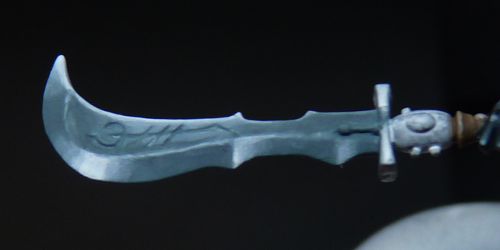
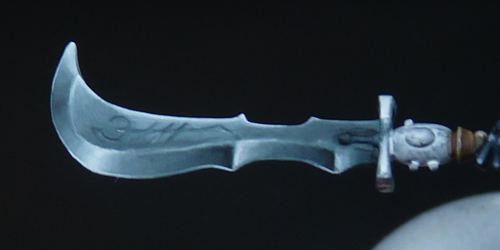
    Third Highlight
    With more Artic Blue added (ratio 1:1 First Highlight mix to Artic Blue), I painted in the next layer of highlights on a smaller area even. Still I am not bothered with blending. At this point I decided that the direction and placement of the highlights looked ok to me, so I proceeded with more highlights. If I hadn’t liked it at this point, I would have started over from the basecoat. Better to make those kind of decisions earlier rather than later ;).

    As you see I also used this highlight mix to paint in the rim between the two surfaces of the blade. I like to emphasize this because in my mind it gives a more reflective look to the material.
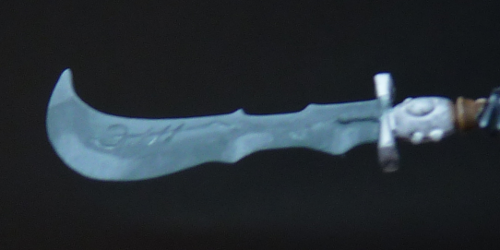
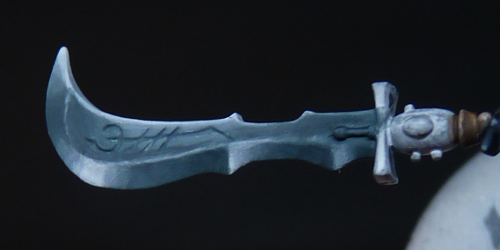
    Fourth Highlight
    The highlights go ever on. I painted the next layer of almost pure Artic Blue. It is not completely pure as I kept adding it to the previous mix, but on my palette they looked the same at this point.


    Fifth Highlight
    Then I started adding White to the Artic Blue, starting slowly with a mix of 1 part white, 4 parts AB. I also make sure to paint this on a smaller area of the line between the areas of the blade.

    Sixth Highlight
    More white! I think the mix is now about 1:1 White to Artic Blue. 

    Seventh Highlight
    The final highlight has got to be white. If metal reflects light, the brightest part is white. So I added White on the smallest of surfaces. But, as you can see on the curved part of the blade it is still quite large.
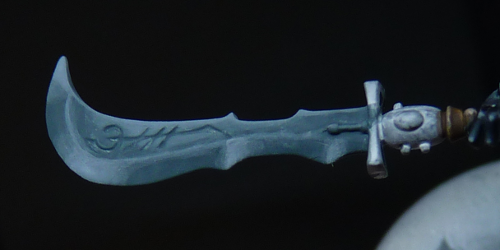
    First Shade
    To get a more reflextive surface it helps to put really light colours close to really dark colours. So of course I needed to do more shading. The first shade is done by adding Abyssal Blue to the basecoat, mix 1:1.

    Second Shade
    Using pure Abyssal Blue I painted another layer of shadow colour. Do you notice that I use less steps for the shading than the highlighting. This has two reasons: The first is that I started the basecoat with quite a dark colour already. The second reason is that the dark colours from Scale Color mix so nicely I didn’t feel like it needed more steps.

    Final Shade
    Oops! I forgot a picture here. I created the final shading by painting pure black on the very tiniest areas.

    Smoothing
    As with all the previous parts of the step-by-steps a lot of smoothing is involved in the next step. Using diluted glazes of the colours used the previous steps I made sure to blend the transitions. Especially in the highlighted areas that was needed.

    Edge highlights
    Then, to finalize the effect I painted edge highlights. The first layer was painted using the Fourth highlight mix on all edges. The second layer was pure white on only the most extreme areas. Because it is such a thin line, there was no smoothing necessary 🙂

    That is it! That is how I painted the weapon. After I took the pictures I did a little more clean-up, which I did not see before ;).
    I hope you enjoyed the fifth part of this step-by-step. If you have any questions, suggestions or request please leave a message! And of course, sharing is encouraged :).
    See you!

    Dark Eldar Step-by-Step Part 5: Steel NMM was last modified: augustus 1st, 2016 by MaGie
    november 26, 2014 0 comment
    3 Facebook Twitter Google + Pinterest
  • Tutorials

    Dark Eldar Step-by-Step Part 4: Cloth, Fur & Skull

    by MaGie november 18, 2014

    Hi everyone! Let’s continue with the Dark Eldar Succubus :). This mini is turning out to be much more complex than I had anticipated, and takes more time to complete…

    Read more
    1 Facebook Twitter Google + Pinterest
  • Tutorials

    Dark Eldar Step-by-Step Part 3: Gold NMM & Leather straps

    by MaGie november 10, 2014

    Hi everyone! Welcome back to the next step-by-step on the Dark Eldar Succubus. If you want to see how I painted the skintones and the armour, please check Part 1 and Part 2.…

    Read more
    3 Facebook Twitter Google + Pinterest
  • Tutorials

    Dark Eldar Step-by-Step Part 2: Clothing & Armour

    by MaGie november 6, 2014

    Hi everyone! Welcome to Part 2 of the Dark Eldar Succubus step by step. If you want to see part 1, where I show how I painted the skin, please…

    Read more
    7 Facebook Twitter Google + Pinterest
  • Favorites

    Favorites of Oktober

    by MaGie november 3, 2014

    Hi everyone! Another month has ended! Usually I start with saying “Wow! This month passed by so fast”, but for some reason this month feels different. Maybe because so many…

    Read more
    0 Facebook Twitter Google + Pinterest
  • Tutorials

    Dark Eldar Step-by-Step Part 1: Skintones

    by MaGie oktober 30, 2014

    Hi everyone! I think many mini painters can relate: when you post a picture of your minis, either work in progress or finished, often other painters will ask: what colours…

    Read more
    3 Facebook Twitter Google + Pinterest
  • Reviews

    Review: ShadowCrafter Miniatures

    by MaGie oktober 27, 2014

    Hi everyone! Today I want to share a review with you, about two miniatures from ShadowCrafter Miniatures, a small company from Spain. A while ago I ordered two of their…

    Read more
    0 Facebook Twitter Google + Pinterest
  • 1
  • …
  • 6
  • 7
  • 8
  • 9
  • 10
  • …
  • 25

About Me

About Me

MaGie

Hi everyone! My name is Maartje Giesbers and I am a miniature painter from the Netherlands. Welcome to my site :)

Keep in touch

Facebook Google + Instagram Youtube Email

Instagram

Recent Posts

  • Redgrass Games: Everlasting Wet Palette 2

  • Update & Revival

  • Redgrass Games: Everlasting Wet Palette

  • Review: Asset Drop Discovery Subscription Box

  • HobbyZone: Painter Grip

Popular Posts

  • Painting skintones: Paints, tips & tricks

    mei 19, 2015
  • Rathcore: V3 Series Miniature Holders

    september 2, 2016
  • Tips & Tricks: How to improve?

    maart 25, 2016
  • Crazy Wenky Display Plinths

    november 9, 2016
  • Step by step: Fast & easy Tattoos

    oktober 22, 2014

Instagram Slider

Geen feed

Archieven

Categorieën

  • Event Reports (10)
  • Favorites (16)
  • Gallery (31)
  • Happy Painting Journey (2)
  • Ramblings (10)
  • Reviews (30)
  • Tutorials (30)
  • Uncategorized (11)
  • Work in Progress (57)

Meta

  • Inloggen
  • Berichten feed
  • Reacties feed
  • WordPress.org
Footer Logo

@2016 - PenciDesign. All Right Reserved. Designed and Developed by PenciDesign


Back To Top